The Bucket Book
  • Home
  • About
  • Video
  • Blog
  • Workshops
  • Resources

Home Bucket Drumming Expiring!

3/26/2024

2 Comments

 
Picture

Hey everybody,

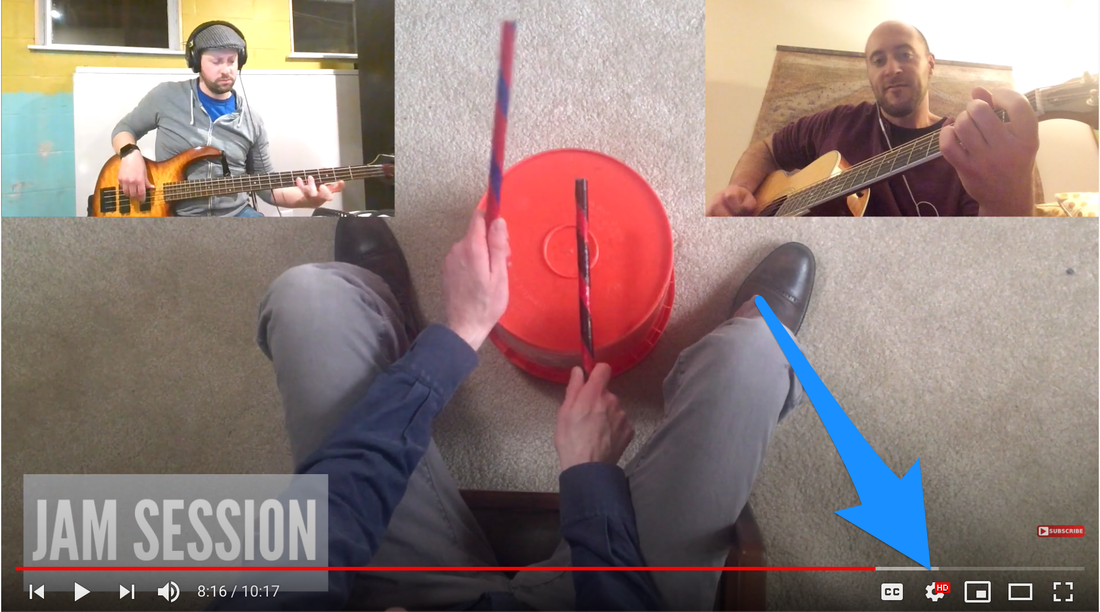
Back in the spring of 2020 when everything went sideways, I made a series of bucket drumming lessons called Home Bucket Drumming for Beginners that students could use at home.

I used material from my book with the hope that the videos would provide teachers with some relief during that nearly impossible time to be a teacher. 

I'm thrilled these videos proved to be useful to teachers around the world!

The video series has now served it's purpose and I'm planning on retiring the video series on April 15, 2024. 

So what could you use instead?
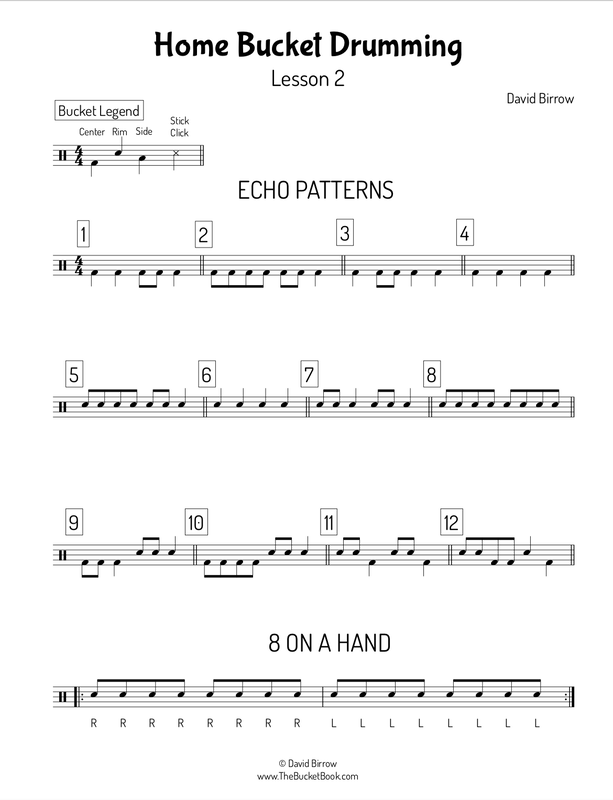
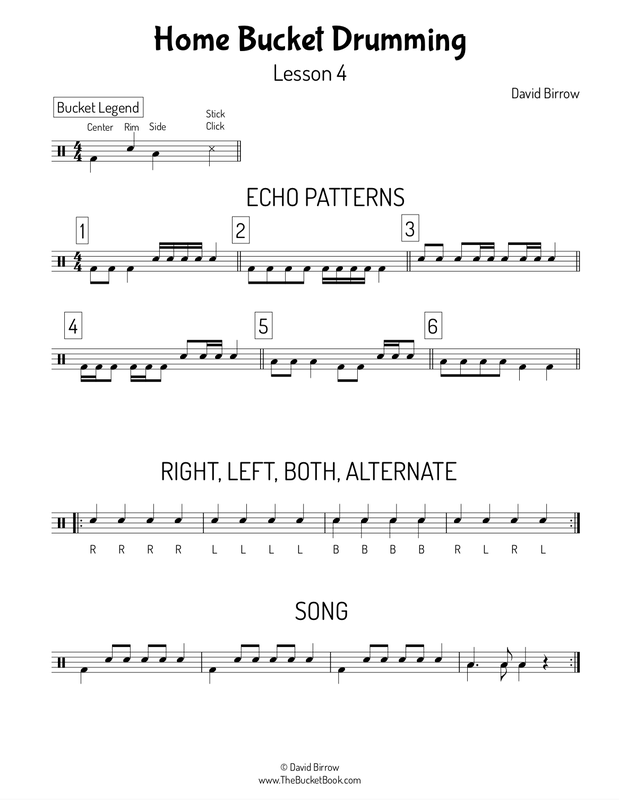
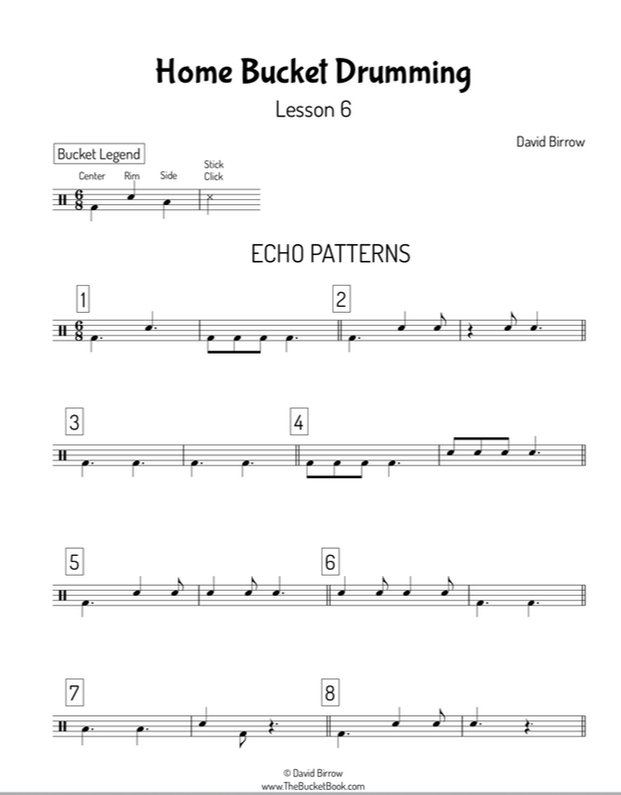
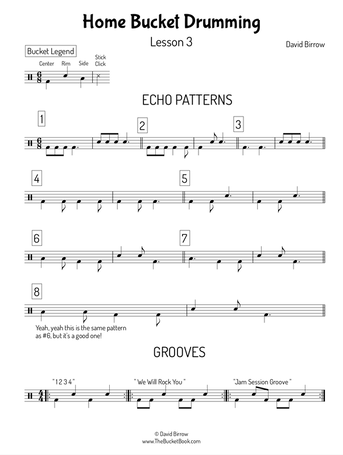
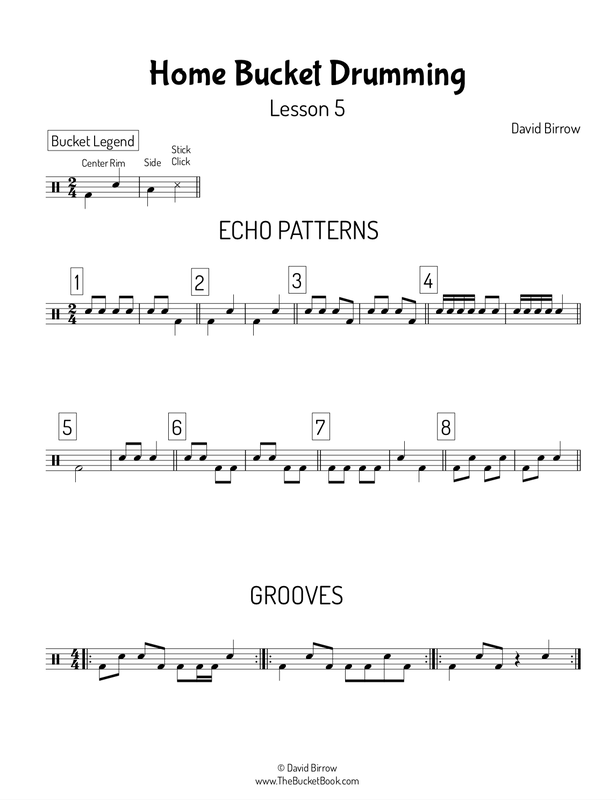
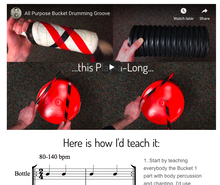
  • Make up your own lessons using The Bucket Book (now available as an e-book!)
  • Join the new Facebook Group: PlayDrums Bucket Drumming Program where you can find more resources and connect me directly and with teachers who teach bucket drumming. (hint hint: also opportunities to possibly get free drum sticks and a copy of the book, just sayin'!)
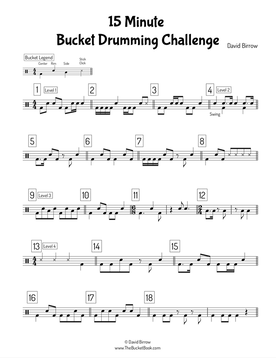
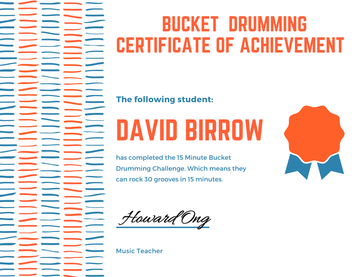
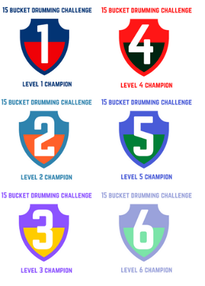
  • The 15 - Minute Bucket Drumming Challenge

2 Comments

The 15 Minute Bucket Drumming Challenge

12/1/2020

4 Comments


What is it?

  • A bucket drumming curriculum set up like a video game. YouTube Playlist with all the videos (click me!)
  • 6 Levels of increasing tempo and difficulty
  • A final Boss Level with all 30 grooves in a row
  • A bunch of distracting backgrounds
  • Probably best for grades 5 and up (I tested it with my 7th and 8th graders)

How do I use it?

  • Just turn it on and play along, use the notation or just copy what you see
  • Start with Level 1 and progress to Level 2 etc...
  • Once you/students are able to play all the videos, have them play the Boss Level
  • Post it for your students on Google Classroom, Schoology, etc. 

Is there sheet music?

Yes, indeed there is!


​
Click to Download PDF
PictureClick to download pdf


​ 

How do I assess my students?

  • Students can post a video of them drumming along to a level on Flipgrid
  • Have them create a "how to" video breaking down and teaching a specific groove
  • Students can compose new grooves to the existing backing tracks
  • Give out Badges online and a Certificate of Completion (just like recorder karate but louder and more awesome!) Download the badges and a certificate template by clicking this link Edit the template to add student names and your signature or just print and write by hand
Picture
Picture

How do I personalize it for my students?

  • Too difficult?
    • Slow down the playback speed using the youtube gear icon
    • Pick one groove and use the corresponding backing track to practice (⬅️click here)  until comfortable
  • Too easy? 
    • Speed up using the youtube gear icon
    • Play a groove with a different backing track (ex. Groove 3 with the 184 bpm track)
    • Use one hand
    • Play with your eyes closed

What else should I know?

  • Students don't need buckets. I've had students use yoga blocks, a Halloween pail, and a laundry bin. Wooden spoons, pencils, or cardboard tubes work for sticks.
  • You might also be interested in:
    • Seven: a drumming duo designed for remote learning
    • Home Bucket Drumming for Beginners:  6 sequential lessons for bucket drumming beginners. Sheet music included as well as playing along with real  musicians. 
4 Comments

Home Bucket Drumming for Beginners: Five Teaching Tips

4/21/2020

8 Comments

 
UPDATE: April 26, 2024 - The Home Bucket Drumming for Beginners Series is now retired. More info here. 

Hello music teachers and parents and students!

I've created a short, online bucket drumming course for your students to use while we're all distance learning/teaching due to Covid-19. The goal is to get your students making music and have some fun while doing it.

The curriculum is hands-off for teachers and hands-on for students and includes some 'greatest hits' from my 15 years of teaching bucket drumming to students ages 8 to adult. It's all road - tested and ready to go; these are all activities I've used with countless students between grades 3 and adult. I've included a lot of play-along/backing tracks in the videos so students get the feel for playing with musicians. Many of the videos even have a Jam Session with my musician buddies who are stuck at home. 

Honestly, just send these videos to your students and they'll do all the work for you. I even include pdfs notating some of the material in the lessons if you'd like your students to read.

Here is the playlist containing all the videos (with more on the way!)
The course runs itself: just have the students get a bucket and sticks and play along with the videos. But here are some ideas to increase student engagement and interaction.

1. Embed or Paste Links for students

Post individual videos to Seesaw, Google Classroom, Schoology, Veracross, or whatever learning management system your school uses. Or post the entire playlist and have students work at their own pace. 

2. Require Exit Tickets

Picture
Give students a chance to prove that they are learning by providing prompts for your students to respond to. They could respond with a comment on your LMS, or better yet audio or video. My favorite option is have students post performance videos on Flipgrid. If you haven't used Flipgrid before, it's awesome. It's a site where your students can share videos with you and other students in your class and students respond with videos of their own. It's worth your time to check out.

Here are some prompts you might use:
  • Lesson 1 - Submit a selfie of you with your bucket and sticks
  • Lesson 2 - Submit a video of you playing "8 on a hand"
  • Lesson 3 - Submit a video of you playing one of the grooves
  • Lesson 4 - Submit a video of you playing along with a song of your choosing (school appropriate!)
  • Lesson 5 - Submit a video of you playing the bucket song
  • Lesson 6 - Submit a video of you teaching how to do one of the things you’ve learned to a family member OR submit a video of a groove or unison that you composed
  • ANY Lesson - Have students perform from the included pdf sheet music 

3. Have Students Do It More Than Once

Think of each video like a workout or better yet: a rehearsal for a performance. Students should play through each video several times to build their skill level.

​You could set a requirement such as: "Play with this video three times between now and next week." I've tried to keep the videos on the shorter side (2-10 minutes) so students would be more apt to repeat. them

4. Speed Up or Slow Down

Students can speed up or slow down the tempo by clicking on the gear icon on YouTube.

Too easy? Tell them to speed it up Too hard? Slow it down.

​ Just like you would do in an actual rehearsal. 
Picture

5. Have Them Read

The videos are designed for rote learning AND I've included PDF sheet music for most of the videos. Below are the links:
Picture
Lesson 2 Sheet Music
Picture
Lesson 4 Sheet Music
Picture
Lesson 6 Sheet Music
Picture
Lesson 3 Sheet Music
Picture
Lesson 5 Sheet Music

Contact me!

Feel free to get in touch with any feedback, ideas, suggestions, or problems (or successes!). Stay tuned for the 15 - Minute Bucket Drumming Challenge, which is a video series for older students. 

TWITTER: @DavidBirrow
EMAIL: [email protected]
8 Comments

Online Learning: Bucket Drumming Duet

3/26/2020

9 Comments

 
Well, here we are: distance learning until at least the first week of May. 
​
Maybe this can help: 

I created two videos that teach your students how to play a bucket drumming duet. The duet is called Seven which is a piece I composed last spring. This new duet version has a break down of how to play it and then has students rehearse the piece along with a recording in a virtual duet.


How to use this for distance learning:

Send your students one of the videos and have them learn it. Maybe you could pair students up and after they can play it, have them record themselves and share the video with their partner. They can then play along with their partner's video like an in person duet.

Or take it a step further and challenge students to edit the two videos together to make it look like they are playing together. Maybe edit together an entire class to create a virtual percussion ensemble. Make sure to let me know if you try this!

Recording tip:

​
Tell students to wear headphones when they record and to play along with the video or have them play to a click at 120 bpm. That way all the recordings will be at the same tempo.

Below are the two videos along with a link to the parts and a full score. Let me know how else I can help. I plan on posting a full distance bucket drumming unit in the coming weeks, so stay tuned and subscribe to receive email updates.

And don't forget to cross your fingers: maybe you will even get a chance to rehearse them in person sometime soon. ????????????

Download PDF Part for Player 1
Download PDF Part for Player 2
Download Full Score ​
9 Comments

Bucket Drumming Starter Pack

5/23/2019

1 Comment

 
Teaching a new unit is hard. Especially getting started. Here are the resources that I get asked about the most when it comes to teaching bucket drumming in a k-12 setting. Each item is a link to a blog post with more information and help.

What do I need and where do I get it? 

The good news is that most instruments/accessories are readily available and cheap. Which is one of the biggest selling points of bucket drumming. 
Picture
Click for full infographic
Picture
Click for full infographic

How do I wrap my sticks in tape?

Picture

Bucket Drumming is so loud. Help!?!

Picture
Click for full infographic
Picture
Why Using Partners in Bucket Drumming Reduces Volume AND Increases Learning

I need music. Where do I get music? 

Picture
Ensemble Piece: PDFs, Video, and Lesson Plan
Picture
One Bucket Groove: Easiest first lesson plan for teachers
Picture
4 Part Groove: PDFs, Video, Lesson Plan

What about movement?

Picture
How to use Orff materials with buckets

I teach on a cart, can I do this?

Picture
Yup, I did it for 7 years. 5 Tips to Survive and Thrive

My buckets stick together, help!

There's no perfect solution for this problem, but this post gives three different ideas.

I like learning from an actual person. Can I do this?

Picture
Yes, absolutely! Join us at the Summer Junkyard Percussion Workshop and learn all the ins and outs of bucket drumming while playing, sharing, and eating some great food! More information here. 
1 Comment

Seven: an easy bucket drumming piece.

4/22/2019

1 Comment

 
​Seven is an easy bucket drumming piece that is suitable for students in 3rd grade and up. The piece is written for two parts and is called Seven because the main motive comprises seven notes. The two parts sometimes interlock, contrast, or play together.

Seven can be played by any number of players and may be taught by notation or by rote. Score and Parts can be downloaded below, as well as a lesson plan and a Cheat Sheet in case you wish to make your own arrangement. Here is a video of a basic arrangement (don't be fooled by my serious expression, it's a really fun piece!):
How to Teach it:

Whether teaching by notation or rote, I have students do a lot of movement and chanting/counting out loud before they begin to play the bucket.

I typically start by teaching the two transitions with students counting "1 2 3 4" or "1 2 3 4 5 6 7" out loud as they play. This is an easy way to start and gets the group playing together in unison before they have to play separate parts.

Transition 1 (Letter D) is most successful when students move their bodies to the beat.

Transition 2 (Letter F) involves dynamics, so it's convenient to talk about how to play at a musical dynamic by using appropriate stick heights, as bucket drumming can get loud if you're not careful.
Body Percussion GrooveMain Groove Combined
After teaching the transitions, your next goal is to get the students to play the main groove first on body percussion and then with sticks.

On the score, the main groove is found at Letter C and on the Cheat Sheet it is Bucket Part 1 and Bucket Part 2. If students first learn a composite part that contains all the pats and claps and 
then learn their individual part, things tend to go smoother. (See the measure labeled: Body Percussion - Combined). 

Then play Body Percussion Part 1 and Body Percussion Part 2 together. Transfer that experience to sticks and buckets and the hardest part of the teaching is done. The claps become stick clicks and the pats are either bucket center or rim depending on the part.

Then all there is left to teach is the slow groove at G, the flashy but simple stick clicking at H, and the roll at the end. Put it all in order and the piece is done.

Click on the image below to download!

Seven Download
Click on the image to download
Some other useful posts:
  • Ultimate List of Volume Hacks for Bucket Drumming
  • Let this video teach your students a bucket drumming groove
  • 2019 Summer Junkyard Percussion Workshop (Registration is now open!)
1 Comment

Ultimate List of Bucket Drumming Volume Hacks

5/6/2018

2 Comments

 
The title explains it all. If you are looking for other volume reducing ideas, check out this post about partner drumming or this one explaining how to turn down the volume.
Picture
2 Comments

Why Using Partners in Bucket Drumming Reduces Volume AND Increases Learning

4/25/2018

1 Comment

 
Picture
The #1 complaint from teachers about bucket drumming is that it's super loud. Which is a completely fair criticism, but not one that should discourage you.

​I've previously posted a bunch of things that you can do to reduce the intensity and duration of bucket drumming. I'll also be posting a giant list of things you can do to reduce volume next month, but right now I thought I'd go in depth on one of the best techniques: Partner Drumming. 

Drumming in partners allows you to cut your bucket supply in half which in turn helps to reduce the volume of your classroom. I started having students play in partners out of necessity: I simply didn't have enough buckets or sticks for all the students. But the math soon became clear:

                     Fewer Buckets = Better Music + Happier Music Teacher

Nowadays I never use more than 12 buckets at any one time which reduces volume and makes setup/hauling far easier. Students work in partners which accommodates 24 students plus a few keeping the steady beat with a glass bottle and shakers and you now have 30+ students. 

So here are some thoughts about how to get it going:

1. Set Up

More math: 2 kids + 1 bucket + 1 pair of sticks

Have partners sit across from each other like so: 
Picture
Note: No guarantee your students will be this happy.

2. Make Sure Everybody Has a Job

Whatever music you happen to be teaching (Grooves, Unisons, Play along etc.), have one partner use the sticks and the other person do something else. Here are some ideas for the non-stick student:
  1. Air drum with imaginary sticks
  2. Chant the rhythm out loud
  3. Use body percussion to play the part
  4. Play a body percussion groove with their left/right neighbor
  5. Keep a simple, steady beat with body percussion.

Reminder: Make sure the students face each other.

Honestly, the most productive choice is for the non-stick partner to chant and air drum while watching their partner. Here's why: If their drumming is in unison with their partner, then they both know the part and are good to go. If they are not in unison, something is wrong but facing their partner gives them a chance to see what it should look like and hopefully adjust.

I know what you are thinking: "What if both students are confused?" Check out #3 for a partial (yet effective) solution.

3. Get Everybody in Circle 

Actually two circles. And only if you have the room as other shapes can work too (ex. parallel lines). As you are teaching/rehearsing, have the inside circle rotate even minute or two so the students get an opportunity to work with many different partners. Have them rotate or dance to the beat (Thanks Jim Solomon for that idea). Make sure the students take turns using the sticks (don't worry, the students won't let you forget!)
Picture
That's a lot of happy drummers
Not only do students get to move and work with different people, but it also creates an opportunity for student feedback: ask students to give a tip to their new partner after seeing them play.  Students know how to talk to other students more effectively than grownups. 

4. Get Creative With The Jobs

You've made sure that everybody has something to do. Great. Now make sure the jobs all feel legit; students will know if you are giving them busy work. Here's an example of a legit job: one student tilts the bucket while the other student drums on it with sticks. This changes the timbre and may logistically sound chaotic, but it's not. Take the first measure of Unison #7 for example:
Picture
This type of arrangement helps to involve all the students all the time. To provide stick equity, work in a four beat stick hand off at the end of the unison. Make sure the switch is in rhythm as this will help keep everybody on beat. It might look like this:
Picture
Remind the students handing off the sticks to simply hold them out front in the air; the other student just grabs them and is ready to go. Stay on beat. The form of all this would be:

         Student 1 Plays Unison #7   -  Hand off Sticks  -  Student 2 Plays Unison #7
PictureClick for more info
So hopefully some of these ideas will be useful for your classroom. Let me know if you have any questions.

​If you'd like to learn more in person, I run an all-day bucket drumming workshop each summer. Details can be found on the workshop page.

1 Comment

Summer Junkyard Percussion Workshop!

4/13/2018

0 Comments

 
Picture
Registration is now open for the 2018 Summer Junkyard Percussion Workshop. Just click on the Workshops link for all the details.

This will be the 4th year I've offered this professional development day. Last year was fantastic with 25 teachers from 8 different states. This year will be great as well as we'll cover lesson plans, activities, materials, classroom management, and composition/improvisation. 

Minneapolis is gorgeous during the summer with a lot to see and do. Make a long weekend of it. (Even though as I write this in April, we're supposed to get a foot of snow!)

Discounts (10%) are available for blog readers using the prom code: BLOG. Feel free to email me at: [email protected] if you are interested or have any follow up questions.

Click for more info
Picture
A shot of happy teachers at the 2017 S.J.P.W.
0 Comments

7 Surplus Store Finds That Will Improve Your Bucket Drumming Classroom

6/2/2017

1 Comment

 
Shopping for music stuff at a surplus store like Ax-Man Surplus is a combination of a treasure hunt and working in Dr. Frankenstein's laboratory: You don't know what you are going to find and the results might be a little bit scary (but awesome). I always have a fun time at Ax-Man AND they have a teacher discount!

Here are 7 things that I've recently found at Ax-Man that I'm planning on using when teaching bucket drumming (there are about a billion other cool things at Ax-Man): 

#1: Ball Bearings 

They may power those blasted fidget spinners, but they also make fantastic fill for shakers. Louder, crisper, and more defined sound than rice. 
Ball Bearings

#2: Duct Tape

Aisle of Duct Tape
There's a lot of duct tape at Ax-Man, and I mean a lot. Like an entire aisle full. Pick up a big roll of the black, red, or classic grey and a couple rolls of colors/patterns for accents. I wrap sticks, safe guard sharp surfaces, and generally repair stuff with duct tape. You'll need a bunch.

Glitter Duct Tape
Neon Duct Tape
Normal Duct Tape

#3: Rubber Pads

#1 Complaint from teachers on Facebook: "Bucket Drumming is too loud." Not any longer. Grab some of these silicone rubber pads and toss them on top of the buckets to dampen the sound. And if you end up really liking the sound, just peel the paper off the back and stick them to the buckets!
Black Neoprene Pad
Grey Neoprene Pad

#4: Foam thing 

Foam thing
   Foam Thing
+ Duct Tape
+ Wooden Dowel
                                ​
= Bass Drum Mallet

Still not convinced? Only $0.35 each!

#5: Dowels

Wooden Dowels
Skinny ones for sticks, thicker ones for mallets (see #4). Bonus thing: check out the plastic dowels behind the wooden ones: They'd probably make great scratcher sticks.

#6: Storage

Multi Colored Baskets
Because your classroom doesn't need to look​ like a junkyard.

#7: Cables

You go to plug in the ipod to the speakers...where's the cable?...it was just here...I need to play music for this next class...the students are walking in the door...  Don't let this happen to you, people! $1.95
Audio Cables
1 Comment
<<Previous

    Author

    I'm David Birrow. I teach and play percussion. This blog is a companion to The Bucket Book. Contact me at : [email protected] or learn more about me at: www.DavidBirrow.com

    Subscribe

    Buy The Bucket Book:

    Categories

    All
    Distance Learning
    Getting Started
    Lesson Plans
    Logistics
    Movement
    Professional Development
    Repertoire
    Volume Control