Junkyard percussion is an extremely practical and musical performance ensemble for your students.
Unfortunately, some teachers who want to teach bucket drumming don’t feel comfortable enough to get started. Others just don’t know where to begin.
Here are some solutions to those common problems.
1. “It’s too loud."
Unfortunately, some teachers who want to teach bucket drumming don’t feel comfortable enough to get started. Others just don’t know where to begin.
Here are some solutions to those common problems.
1. “It’s too loud."
It’s true: bucket drumming has a higher volume ceiling than other ensembles. But that should not deter you from teaching bucket drumming. Earlier this year, I described three simple/quick/cheap ways to reduce the volume of your classroom. With a little care, nobody should ever worry about hearing damage when teaching bucket drumming.
2. “I don’t know where to get the instruments."
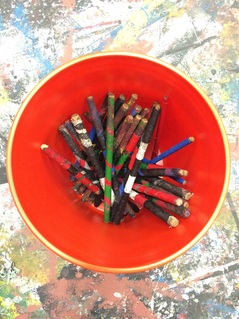
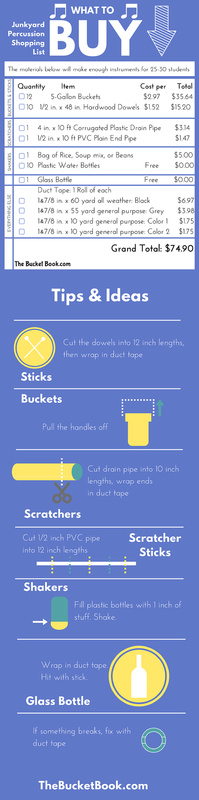
Don’t worry, I do! Just use this shopping list to gather the instruments you need. The list explains what, where, and how much stuff you need. If you are looking for buckets on the cheap (or free) take a look at this list of bucket sources.
Don’t worry, I do! Just use this shopping list to gather the instruments you need. The list explains what, where, and how much stuff you need. If you are looking for buckets on the cheap (or free) take a look at this list of bucket sources.
 |  |
3. “What music should my students play?"
Start simple by converting music that you’ve already taught students. And it doesn’t need to be percussion music either. For example, have the students sing a familiar song while a few students perform an ostinato on drain pipe scratchers or play a One Bucket Groove. Use some of the volume techniques from #1 above to keep the drumming dynamic below the singing.
Another example: teach a body percussion piece from Rhythmische Ubung by Gunild Keetman, then convert the body percussion sounds to bucket drumming sounds. For instnace, hand claps turn into rim sounds, stomps are the center of the bucket etc. Or better yet: add movement. Below is a video from an article I wrote for A.O.S.A.'s Reverberations that demonstrates body percussion converted to movement.
4. “I don’t feel comfortable since I’m not a drummer."
No problem, you don’t need to be Buddy Rich or Questlove to teach bucket drumming. For instance, I’m not a professional trombonist but I teach beginning band. You just need to know more and be able to play (slightly) better than your students do. I practice trumpet and trombone a few times a week to make sure I’m a few months ahead of my students. You can do the same for bucket drumming by learning/practicing the music in this post from last year.
| 5. “I teach from a cart, so it’s not possible." I don’t have a room either! I’ve taught almost exclusively in grade level classrooms, so I can tell you it’s not only possible, but it actually forces you to use some best teaching practices for bucket drumming. Read more here: 5 Tips for Teaching Bucket Drumming on a Cart. |  |
